AI 生成摘要
完整演示 UIKit 中 UITableView 的实践流程,涵盖 NavigationController 导航配置、自定义 Cell(Auto Layout 约束)、UITableViewDiffableDataSource 数据源、NSDiffableDataSourceSnapshot 快照更新及下拉刷新实现。(预计阅读 34 分钟)
下面记录一下 UIKit 中 UITableView 的实践笔记。
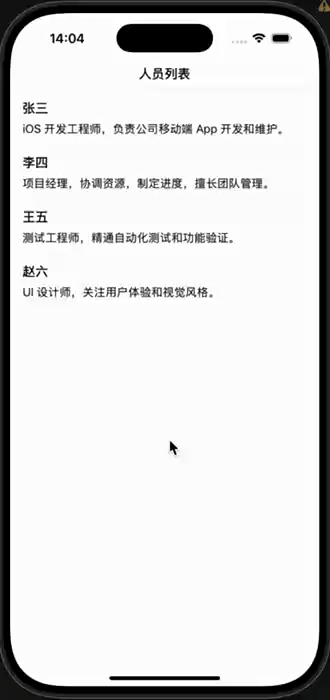
最终实现效果如下所示:
一、添加 NagivationController
首先在 SceneDelegate.swift 文件中添加 导航。
修改方法 func scene 中代码如下:
func scene(_ scene: UIScene, willConnectTo session: UISceneSession, options connectionOptions: UIScene.ConnectionOptions) {
    guard let windowScene = (scene as? UIWindowScene) else { return }

    let window = UIWindow(windowScene: windowScene)
    // 创建一个导航控制器,并将 ViewController 作为根视图控制器
    let navController = UINavigationController(rootViewController: ViewController())
    // 设置窗口的根视图控制器为导航控制器
    window.rootViewController = navController
    self.window = window
    // 使窗口成为主窗口并显示
    window.makeKeyAndVisible()
}
二、创建 Person 数据类
新建 Person 结构类,如下所示:
struct Person: Hashable {
    let id = UUID()
    let name: String
    let description: String
}
三、创建自定义 Cell
创建 CustomCell 类,并使该类继承于 UITableViewCell,具体代码如下:
import Foundation
import UIKit

class CustomCell: UITableViewCell {
    let nameLabel = UILabel()
    let descriptionLabel = UILabel()

    override init(style: UITableViewCell.CellStyle, reuseIdentifier: String?) {
        super.init(style: style, reuseIdentifier: reuseIdentifier)
        setupViews()
    }

    required init?(coder: NSCoder) {
        fatalError("init(coder:) has not been implemented")
    }

    private func setupViews() {
        nameLabel.font = .preferredFont(forTextStyle: .headline)
        descriptionLabel.font = .preferredFont(forTextStyle: .subheadline)
        descriptionLabel.numberOfLines = 0

        [nameLabel, descriptionLabel].forEach {
         		// 关闭系统的自动布局转换,避免冲突
            $0.translatesAutoresizingMaskIntoConstraints = false
            contentView.addSubview($0)
        }

        NSLayoutConstraint.activate([
            nameLabel.topAnchor.constraint(equalTo: contentView.topAnchor, constant: 12),
            nameLabel.leadingAnchor.constraint(equalTo: contentView.leadingAnchor, constant: 16),
            nameLabel.trailingAnchor.constraint(equalTo: contentView.trailingAnchor, constant: -16),

            descriptionLabel.topAnchor.constraint(equalTo: nameLabel.bottomAnchor, constant: 8),
            descriptionLabel.leadingAnchor.constraint(equalTo: nameLabel.leadingAnchor),
            descriptionLabel.trailingAnchor.constraint(equalTo: nameLabel.trailingAnchor),
            descriptionLabel.bottomAnchor.constraint(equalTo: contentView.bottomAnchor, constant: -12)
        ])
    }

    func configure(with person: Person) {
        nameLabel.text = person.name
        descriptionLabel.text = person.description
    }
}
四、完成人员列表展示
回到 ViewController 。
- 首先在
ViewController中新建枚举Section,稍后用于在 Snapshot 中管理分区。
import UIkit

class ViewController: UIViewController {
    enum Section {
     	 case main
    }
}
- 创建两个类型别名。
class ViewController: UIViewController {
    // ...

    // 描述 UITableView 当前数据状态(快照),避免直接操作数据源
    typealias Snapshot = NSDiffableDataSourceSnapshot
    typealias DataSource = UITableViewDiffableDataSource
}
UITableViewDiffableDataSource(DataSource) 作用:
- 用于替代传统的 UITableViewDataSource,负责管理 UITableView 的数据源,同时可以自动处理 UITableView 的数据更新和动画效果。不需要手动去实现 numberOfRowsInSection 和 cellForRowAt 等方法。
NSDiffableDataSourceSnapshop(Snapshop) 作用:
- 描述 UITableView 当前的数据状态(快照),通过 apply 方法将 Snapshop 快照应用到 DataSource,并自动计算差异和播放动画。避免直接操作数据源,而是通过快照来更新 UI。
- 添加
TableView组件和相关数据变量
class ViewController: UIViewController {
    // ...

    // UITableView 组件
    private let tableView = UITableView()

    // 人员信息数据源
    private let people: [Person] = []

    // 复用 Cell 标识
    private let cellID = "CustomeCell"

    // UITableView 数据源
    private var dataSource: DataSource<Section, Person>!
}
- 初始化 UI。
class ViewController: UIViewController {
    // ...

    override func viewDidLoad() {
        super.viewDidLoad()

        title = "人员列表"
        view.backgroundColor = .systemBackground
        navigationController?.navigationBar.prefersLargeTitles = true

        // TODO: delegate 稍后实现,在本文中用于处理点击跳转页面
        tableView.delegate = self

        // TODO: 下面三个方法稍后实现
        setupTableView()
        configureDataSource()
        loadData()
    }
}
- 实现
setupTableView(),配置 UITableView。
class ViewController: UIViewController {
    // ...

    private func setupTableView() {
        // 关闭自动转换 autoresizing mask 为 constraints,以便使用 Auto Layout
        tableView.translatesAutoresizingMaskIntoConstraints = false
        // 注册自定义 cell 类型,并指定重用标识符
        tableView.register(CustomCell.self, forCellReuseIdentifier: cellID)
        // 设置行高为自动计算(根据内容自适应)
        tableView.rowHeight = UITableView.automaticDimension
        // 设置预估行高(优化性能,帮助 UITableView 计算滚动条)
        tableView.estimatedRowHeight = 100
        view.addSubview(tableView)

        // 设置 UITableView 布局约束
        NSLayoutConstraint.activate([
            tableView.topAnchor.constraint(equalTo: view.safeAreaLayoutGuide.topAnchor),
            tableView.bottomAnchor.constraint(equalTo: view.bottomAnchor),
            tableView.leadingAnchor.constraint(equalTo: view.leadingAnchor),
            tableView.trailingAnchor.constraint(equalTo: view.trailingAnchor)
        ])

        // 给 UITableView 添加下拉刷新
        let refreshControl = UIRefreshControl()
        refreshControl.addTarget(self, action: #selector(refreshData), for: .valueChanged)
        tableView.refreshControl = refreshControl
    }

    /// 下拉刷新事件
    @objc private func refreshData() {
      DispatchQueue.main.asyncAfter(deadline: .now() + 1) {
        // 模拟网络请求
        self.people.shuffle()
        // TODO: 应用快照方法稍后实现
        self.applySnapshop()
        // 停止下拉刷新
        self.tableView.refreshControl?.endRefreshing()
      }
    }
}
- 实现
configureDataSource(),配置数据源。
class ViewController: UIViewController {
    // ...

    /// 配置 UITableView 数据源
    private func configureDataSource() {
        dataSource = UITableViewDiffableDataSource<Section, Person>(
            tableView: tableView,
            cellProvider: { tableView, indexPath, person in
                // 尝试从 tableView 的重用队列中获取 CustomCell 类型的单元格
                guard let cell = tableView.dequeueReusableCell(
                    withIdentifier: self.cellID,
                    for: indexPath
                ) as? CustomCell else {
                    // 如果获取失败,返回一个默认的 UITableViewCell
                    return UITableViewCell()
                }
                cell.configure(with: person)
                return cell
            }
        )
    }
}
- 实现
loadData(),加载人员列表数据。
class ViewController: UIViewController {
    // ...

    /// 填充 people
    private func loadData() {
        people = [
            Person(name: "张三", description: "iOS 开发工程师,负责公司移动端 App 开发和维护。"),
            Person(name: "李四", description: "项目经理,协调资源,制定进度,擅长团队管理。"),
            Person(name: "王五", description: "测试工程师,精通自动化测试和功能验证。"),
            Person(name: "赵六", description: "UI 设计师,关注用户体验和视觉风格。")
        ]
        // TODO: 应用快照方法下面实现
        applySnapshot()
    }
}
- 实现
applySnapshot(),应用快照到 UITableView。
class ViewController: UIViewController {
  	// ...

    // 应用快照
    private func applySnapshot() {
        // 创建一个新的数据快照实例,指定 Section 和 Person 作为泛型参数
        var snapshot = Snapshot<Section, Person>()
        // 向快照中添加一个 section(.main)
        snapshot.appendSections([.main])
        // 将 people 数组中的所有数据添加到 .main section 中
        snapshot.appendItems(people, toSection: .main)
        // 将快照应用到 dataSource,并启用动画效果
        dataSource.apply(snapshot, animatingDifferences: true)
    }
}
- 最后,扩展 ViewController,使其遵循
UITableViewDelegate协议。
extension ViewController: UITableViewDelegate {
  	// 实现 tableView 的选中行代理方法
    func tableView(_ tableView: UITableView, didSelectRowAt indexPath: IndexPath) {
        guard let person = dataSource.itemIdentifier(for: indexPath) else { return }
      	// TODO: DetailViewController 详情视图控制器在下面实现
        let detailVC = DetailViewController(person: person)
        // 使用导航控制器 push 跳转到详情页,并启用动画效果
        navigationController?.pushViewController(detailVC, animated: true)
        // 取消选中行的选中状态
        tableView.deselectRow(at: indexPath, animated: true)
    }
}
- UITableViewDelegate 主要用于处理表格的交互行为和外观控制。
- ViewController 完整代码。
import UIKit

class ViewController: UIViewController {

    enum Section {
        case main
    }

    typealias Snapshot = NSDiffableDataSourceSnapshot
    typealias DataSource = UITableViewDiffableDataSource

    private let tableView = UITableView()
    private var people: [Person] = []
    private let cellID = "CustomCell"

    private var dataSource: DataSource<Section, Person>!

    override func viewDidLoad() {
        super.viewDidLoad()
        // Do any additional setup after loading the view.

        title = "人员列表"
        view.backgroundColor = .systemBackground
        navigationController?.navigationBar.prefersLargeTitles = true

        tableView.delegate = self

        setupTableView()
        configureDataSource()
        loadData()
    }

    private func setupTableView() {
        // 关闭系统的自动转换布局,使用 AutoLayout
        tableView.translatesAutoresizingMaskIntoConstraints = false
        tableView.register(CustomCell.self, forCellReuseIdentifier: cellID)
        tableView.rowHeight = UITableView.automaticDimension
        tableView.estimatedRowHeight = 100
        view.addSubview(tableView)

        NSLayoutConstraint.activate([
            tableView.topAnchor.constraint(equalTo: view.safeAreaLayoutGuide.topAnchor),
            tableView.bottomAnchor.constraint(equalTo: view.bottomAnchor),
            tableView.leadingAnchor.constraint(equalTo: view.leadingAnchor),
            tableView.trailingAnchor.constraint(equalTo: view.trailingAnchor)
        ])

        // 下拉刷新
        let refreshControl = UIRefreshControl()
        refreshControl.addTarget(self, action: #selector(refreshData), for: .valueChanged)
        tableView.refreshControl = refreshControl
    }

    private func configureDataSource() {
        dataSource = UITableViewDiffableDataSource<Section, Person>(
            tableView: tableView,
            cellProvider: { tableView, indexPath, person in
                guard let cell = tableView.dequeueReusableCell(
                    withIdentifier: self.cellID,
                    for: indexPath
                ) as? CustomCell else {
                    return UITableViewCell()
                }
                cell.configure(with: person)
                return cell
            }
        )
    }

    private func loadData() {
        people = [
            Person(name: "张三", description: "iOS 开发工程师,负责公司移动端 App 开发和维护。"),
            Person(name: "李四", description: "项目经理,协调资源,制定进度,擅长团队管理。"),
            Person(name: "王五", description: "测试工程师,精通自动化测试和功能验证。"),
            Person(name: "赵六", description: "UI 设计师,关注用户体验和视觉风格。")
        ]
        applySnapshot()
    }

    private func applySnapshot() {
        var snapshot = Snapshot<Section, Person>()
        snapshot.appendSections([.main])
        snapshot.appendItems(people, toSection: .main)
        dataSource.apply(snapshot, animatingDifferences: true)
    }

    @objc private func refreshData() {
        DispatchQueue.main.asyncAfter(deadline: .now() + 1) {
            self.people.shuffle()
            self.applySnapshot()
            self.tableView.refreshControl?.endRefreshing()
        }
    }
}

extension ViewController: UITableViewDelegate {
    func tableView(_ tableView: UITableView, didSelectRowAt indexPath: IndexPath) {
        guard let person = dataSource.itemIdentifier(for: indexPath) else { return }
        let detailVC = DetailViewController(person: person)
        navigationController?.pushViewController(detailVC, animated: true)
        tableView.deselectRow(at: indexPath, animated: true)
    }
}
五、完成人员详情展示
人员详情页面比较简单,通过一个 UILabel 显示当前用户的详情,这里直接贴上完整代码。
import UIKit

class DetailViewController: UIViewController {

    private let descriptionLabel = UILabel()
    private let person: Person

    init(person: Person) {
        self.person = person
        super.init(nibName: nil, bundle: nil)

        title = person.name

        navigationItem.largeTitleDisplayMode = .inline
    }

    required init?(coder: NSCoder) {
        fatalError("init(coder:) has not been implemented")
    }

    override func viewDidLoad() {
        super.viewDidLoad()
        view.backgroundColor = .systemBackground

        // 设置 UILabel
        descriptionLabel.translatesAutoresizingMaskIntoConstraints = false
        descriptionLabel.text = person.description
        descriptionLabel.font = .preferredFont(forTextStyle: .body)
        descriptionLabel.numberOfLines = 0

        view.addSubview(descriptionLabel)

        NSLayoutConstraint.activate([
            descriptionLabel.topAnchor.constraint(equalTo: view.safeAreaLayoutGuide.topAnchor, constant: 20),
            descriptionLabel.leadingAnchor.constraint(equalTo: view.leadingAnchor, constant: 20),
            descriptionLabel.trailingAnchor.constraint(equalTo: view.trailingAnchor, constant: -20)
        ])
    }
}