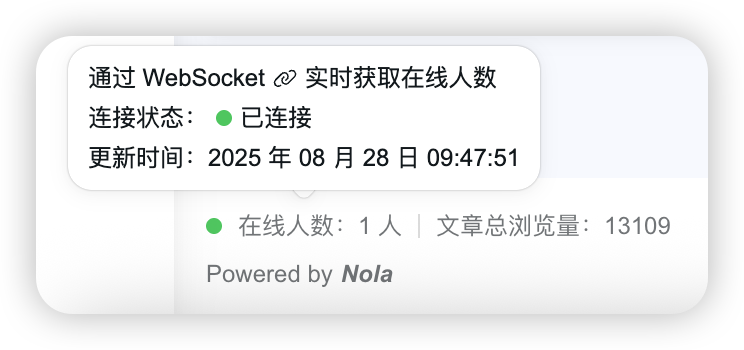
目前 Nola 博客已经实现了此功能,在当前页面的页脚中即可看到。

本文记录一下使用 Ktor 后端 + Next.js 通过 WebSocket 实现前端页面在线人数的展示。
一、Ktor
1. 导入依赖
首先在 Ktor 中,导入 WebSocket 依赖:
// WebSocket
implementation("io.ktor:ktor-server-websockets:$ktor_version")
2. 启用 WebSocket 插件
新建一个 WebSocketPlugin.kt 文件,并写入下面的代码,配置 WebSocket 插件:
import io.ktor.server.application.*
import io.ktor.server.websocket.*
import kotlin.time.Duration.Companion.seconds

fun Application.configureWebSocket() {
    install(WebSockets) {
        // ping 之间的持续时间
        pingPeriod = 30.seconds

        // 超时时间
        timeout = 15.seconds

        // 帧最大大小
        maxFrameSize = Long.MAX_VALUE

        // 是否使用掩码
        masking = false
    }
}
然后在 Ktor 应用的 Application 上下文中启用该插件即可:
fun Application.module() {
    // ... 其他插件配置

    // WebSocket 配置
    configureWebSocket()
}
3. 编写 Manager 类
新建一个 BlogOnlineManager 类,用于管理 WebSocket 的连接和记录当前在线人数。
同时限制了每个 IP 地址最多只能同时建立 5 个连接,第 6 个连接会被直接关闭,这里可以根据自己的需求进行修改。
import cc.loac.extensions.toJSONString
import io.ktor.websocket.WebSocketSession
import io.ktor.websocket.send
import kotlinx.coroutines.CoroutineScope
import kotlinx.coroutines.Dispatchers
import kotlinx.coroutines.Job
import kotlinx.coroutines.delay
import kotlinx.coroutines.launch
import kotlinx.coroutines.sync.Mutex
import kotlinx.coroutines.sync.withLock
import java.util.concurrent.ConcurrentHashMap
import java.util.concurrent.atomic.AtomicInteger

/**
 * 博客前端在线人数数量管理
 */
class BlogOnlineManager private constructor() {

    companion object {
        @Volatile
        private var instance: BlogOnlineManager? = null

        private var ioScope = CoroutineScope(Dispatchers.IO)

        // 定时任务
        private var job: Job? = null

        /**
         * 获取 Manager 实例
         * @return 唯一 BlogOnlineManager 实例
         */
        fun getInstance(): BlogOnlineManager {
            return instance ?: synchronized(this) {
                instance ?: BlogOnlineManager().also {
                    instance = it


                    if (job == null) {
                        // 启动定时任务
                        job = ioScope.launch {
                            // 每 30 分钟尝试清理一次无效连接
                            while (true) {
                                delay(1000 * 60 * 30)
                                instance?.cleanupDeadConnections()
                            }
                        }
                    }
                }
            }
        }
    }

    private val connectionMutex = Mutex()

    // 当前连接的 Session
    private val connections = ConcurrentHashMap<String, WebSocketSession>()

    // 在线人数
    private val onlineCount = AtomicInteger(0)

    // IP 连接计数,防止单个 IP 过多连接
    private val ipConnectionCount = ConcurrentHashMap<String, AtomicInteger>()

    // 每个 IP 最多只计算 5 个设备
    private val maxConnectionsPerIp = 5

    /**
     * 添加连接
     * @param sessionId Session ID
     * @param session WebSocketSession
     * @param clientIp 客户端 IP
     * @return 是否添加成功(如果当前 IP 数量超过 5 个,则认为失败)
     */
    suspend fun addConnection(
        sessionId: String,
        session: WebSocketSession,
        clientIp: String
    ): Boolean {
        return connectionMutex.withLock {
            // 检查单个 IP 连接数限制
            val ipCount = ipConnectionCount.computeIfAbsent(clientIp) { AtomicInteger(0) }
            if (ipCount.get() >= maxConnectionsPerIp) {
                return@withLock false
            }

            connections[sessionId] = session
            ipCount.incrementAndGet()
            val currentCount = onlineCount.incrementAndGet()

            // 广播新的在线人数
            broadcastOnlineCount(currentCount)
            true
        }
    }

    /**
     * 移除连接
     * @param sessionId Session ID
     * @param clientIp 客户端 IP
     */
    suspend fun removeConnection(sessionId: String, clientIp: String) {
        return connectionMutex.withLock {
            connections.remove(sessionId)
            ipConnectionCount[clientIp]?.decrementAndGet()
            val currentCount = onlineCount.decrementAndGet()

            // 广播新的在线人数
            broadcastOnlineCount(currentCount)
        }
    }

    /**
     * 广播在线人数
     * @param count 在线人数
     */
    private suspend fun broadcastOnlineCount(count: Int) {
        val message = OnlineCount(
            count = count,
            timestamp = System.currentTimeMillis()
        ).toJSONString()

        val deadConnections = mutableListOf<String>()

        connections.forEach { (sessionId, session) ->
            try {
                session.send(message)
            } catch (_: Exception) {
                // 记录死连接,稍后清理
                deadConnections.add(sessionId)
            }
        }

        // 清理死连接
        deadConnections.forEach { sessionId ->
            connections.remove(sessionId)
            onlineCount.decrementAndGet()
        }
    }

    /**
     * 获取当前连接数量
     */
    fun getCurrentCount(): Int = onlineCount.get()

    /**
     * 清理无效连接
     */
    suspend fun cleanupDeadConnections() {
        connectionMutex.withLock {
            val deadConnections = mutableListOf<String>()

            connections.forEach { (sessionId, session) ->
                try {
                    // 发送心跳检测
                    session.send("ping")
                } catch (_: Exception) {
                    deadConnections.add(sessionId)
                }
            }

            deadConnections.forEach { sessionId ->
                connections.remove(sessionId)
                onlineCount.decrementAndGet()
            }
        }
    }
}

/**
 * 在线人数响应类
 * @param count 人数
 * @param timestamp 时间戳毫秒
 */
data class OnlineCount(
    val count: Int,
    val timestamp: Long
)
4. 编写路由
在路由中新建 WebSocket 路由,代码如下所示:
webSocket("online") {
  	// 每个连接的唯一 UUID
    val sessionId = UUID.randomUUID().toString()
    // 客户端 IP
    val clientIp = call.request.origin.remoteHost
  	// 获取 Manager 实例
    val manager = BlogOnlineManager.getInstance()

    // 验证并发起连接
    if (!manager.addConnection(sessionId, this, clientIp)) {
        close(CloseReason(CloseReason.Codes.CANNOT_ACCEPT, "来自 $clientIp 的连接太多"))
        return@webSocket
    }

    try {
        // 处理客户端消息
        for (frame in incoming) {
            // 这里只处理了客户端的心跳消息,其他任何来自客户端的消息均忽略
            when (frame) {
                is Frame.Text -> {
                    // 回复客户端心跳消息
                    val text = frame.readText()
                    if (text == "ping") {
                        send(Frame.Text("pong"))
                    }
                }

                is Frame.Close -> {
                    break
                }

                else -> {}
            }
        }

    } catch (_: ClosedReceiveChannelException) {
        // 连接正常关闭
    } catch (e: Exception) {
        // .error() 是一个日志打印扩展函数,用于打印错误日志
        e.localizedMessage.error()
    } finally {
        // 客户端断开和发生错误时移除 WebSocket 连接
        manager.removeConnection(sessionId, clientIp)
    }
}
5. (可选)限流器
上面已经实现了 WebSocket 计数的功能,如果想要实现对该 WebSocket 接口请求速度进行限制,可以使用 Ktor 的一个官方插件 Rate Limit。
首先导入 Rate Limit 依赖:
// 接口访问速率限制
implementation("io.ktor:ktor-server-rate-limit:$ktor_version")
新建一个RateLimitPlugin.kt 文件用于配置 Rate Limit:
import io.ktor.server.application.*
import io.ktor.server.plugins.origin
import io.ktor.server.plugins.ratelimit.*
import kotlin.time.Duration.Companion.minutes
import kotlin.time.Duration.Companion.seconds

/** 在线人数 WebSocket 限流器 **/
val LIMITER_ONLINE_COUNT_WB = RateLimitName("LIMITER_ONLINE_COUNT_WB")

/**
 * 配置接口速率限制插件
 */
fun Application.configureRateLimit() {
    install(RateLimit) {
        // 全局限制器
        global {
            rateLimiter(limit = 300, refillPeriod = 60.seconds)
        }

        // 在线人数 WebSocket 限流器
        register(LIMITER_ONLINE_COUNT_WB) {
            // 每分钟内最多请求 10 次
            rateLimiter(limit = 10, refillPeriod = 1.minutes)
            // 使用客户端 IP 作为 Key
            requestKey { call ->
                call.request.origin.remoteHost
            }
        }
    }
}
接着在 Ktor 应用的 Application 上下文中启用插件:
fun Application.module() {
    // ... 其他插件配置

    // WebSocket 配置
    configureWebSocket()

    // 接口访问速率限制配置
    configureRateLimit()
}
随后在 WebSocket 的路由外套上 rateLimit()方法,即可实现对 WebSocket 接口的限流:
// 限流器,LIMITER_ONLINE_COUNT_WB 是上面在 RateLimit 插件中定义的规则
rateLimit(LIMITER_ONLINE_COUNT_WB) {
    webSocket("online") {
    	// WebSocket 路由体
    }
}
二、Next.js
1. 定义 Hook
在 Next.js 中,使用一个 Hook 来处理 WebSocket 连接和响应。
新建一个 useOnlineCount.ts 方法:
import { useEffect, useRef, useState } from 'react';
import { OnlineCountResponse } from '@/models/response/OnlineCountResponse';

/**
 * 获取当前博客在线人数 Hook
 */
export const useOnlineCount = () => {

  // 当前人数
  const [onlineCount, setOnlineCount] = useState<number>(0);

  // 更新时间戳
  const [updateTime, setUpdateTime] = useState<number>(0);

  // WebSocket Ref
  const wsRef = useRef<WebSocket | null>(null);

  useEffect(() => {
    // 创建 WebSocket 连接

    // WebSocket 服务器地址(ws:// 或者 wss:// 开头,取决于是否启用了 HTTPS)
    // 例如:ws://localhost:8098, wss://loac.cc
    const serverUrl = process.env.NEXT_PUBLIC_WEBSOCKET_URL;
    if (!serverUrl) {
      setOnlineCount(-1)
      setUpdateTime(-1)
      console.error('WEBSOCKET_URL is not defined');
      return;
    }

    // 上面在 Ktor 中定义的 WebSocket 路由地址
    const wsUrl = `${serverUrl}/online`;

    // 创建 WebSocket 连接
    const ws = new WebSocket(wsUrl);
    wsRef.current = ws;

    // 监听服务器消息
    ws.onmessage = (event) => {
      try {
        if (String(event.data) == 'ping') {
          // 服务器向客户端发送 ping,无需处理
        } else {
          // 收到在线人数数据
          const data: OnlineCountResponse = JSON.parse(event.data);
          setOnlineCount(data.count);
          setUpdateTime(data.timestamp)
        }
      } catch (error) {
        setOnlineCount(-1)
        setUpdateTime(-1)
        console.error(`WebSocket 解析消息失败:${error}`);
      }
    };

    ws.onopen = () => {
      // 连接成功
    }

    ws.onclose = () => {
      console.log('WebSocket 连接已关闭');
      setOnlineCount(-1)
      setUpdateTime(-1)
    }

    ws.onerror = (error) => {
      console.error(`WebSocket 错误:${error}`);
      setOnlineCount(-1)
      setUpdateTime(-1)
    }

    // 页面卸载时关闭连接
    const handleBeforeUnload = () => {
      ws.close();
    }
    window.addEventListener('beforeunload', handleBeforeUnload)

    return () => {
      ws.close();
      window.removeEventListener('beforeunload', handleBeforeUnload)
    }
  }, []);
  return onlineCount
};
2. 使用 Hook
Hook 定义完成后,就可以在页面上进行展示了,下面是一个例子:
'use client';
import { useOnlineCount } from '@/hooks/useOnlineCount';

/**
 * 博客在线人数显示组件
 */
export default function OnlineCounter() {
  const { onlineCount, updateTime } = useOnlineCount();
  return (
    <div>
      <p>当前在线人数:{onlineCount} 人</p>
      {/*formatDate() 是一个将时间戳毫秒转换为字符串的方法*/}
      <p>更新时间:{updateTime > 0 ? formatDate(updateTime) : '未知'}</p>
    </div>
  );
}
