Service标准代码和用法
Android四大组件之一。
在项目中右键包名->New->Service->Service可以新建一个Service
一、Service标准代码和用法
class MyService : Service() {

    override fun onBind(intent: Intent): IBinder {
        // Service()中唯一抽象方法,用于和Activity互动
    }

    override fun onCreate() {
        super.onCreate()
        // Service创建时调用
    }

    override fun onStartCommand(intent: Intent, flags: Int,
            startId: Int): Int {
        // Service每次启动时调用
        // 如果希望Service一启动就执行某个动作就写在这里
        return super.onStartCommand(intent, flags, startId)
    }

    override fun onDestroy() {
        super.onDestroy()
        // Service销毁时调用,回收不再使用的资源
    }
}
需要注意,每一个Service都需要在AndroidManifest.xml中注册才能生效,不过如果是一键生成的话,AndroidStudio会帮我们注册:
<application ...>
    <service
        android:name=".MyService"
        android:enabled="true"
        android:exported="true">
    </service>
</application>
二、启动和停止Service
1.启动Service
startServiceBtn.setOnClickListener {
    val intent = Intent(this, MyService::class.java)
    startService(intent) // 启动Service
}
2.停止Service
stopServiceBtn.setOnClickListener {
    val intent = Intent(this, MyService::class.java)
    stopService(intent) // 停止Service
}
3.Service自我停止
// 在Service内部调用
stopSelf()
从Android8.0开始,应用后台功能被大幅削减,现在只有当应用保持在前台可见状态下Service才能稳定运行,一旦应用进入后台,Service随时都有可能被系统回收,如果真的需要在后台长期执行一些任务,可以使用前台Service或者WorkManager。
onCreate()和onStartCommand()区别:onCreate()只有在Service第一次创建时才会调用,而onStartCommand()在每次启动Service时都会调用。
三、Activity和Service进行通信
Service在整个应用程序范围内都是通用的,即MyService不仅可以和MainActivity绑定,还可以和任何一个其他的Activity进行绑定,而且绑定完成后,它们都会获得相同的DownloadBinder实例。
比如,目前我们希望在MyService里提供一个下载功能,然后在Activity中可以决定何时开始下载,以及随时查看下载进度。实现这个功能的思路是创建一个专门的Binder对象来对下载功能进行管理,修改MyService代码,如下:
class MyService : Service() {
    private val mBinder = DownloadBinder()

    class DownloadBinder : Binder() {
        // 开始下载
        fun startDownload() {
            Log.d("MyService", "startDownload executed")
        }

        // 查看下载进度
        fun getProgress(): Int {
            Log.d("MyService", "getProgress executed")
            return 0
        }
    }

    override fun onBind(intent: Intent): IBinder {
        // 返回DownloadBinder实例
        return mBinder
    }
    ...
}
当一个Activity与Service绑定之后,就可以调用该Service里的Binder提供的方法了,修改MainActivity中代码,如下:
class MainActivity : AppCompatActivity() {
    lateinit var downloadBinder: MyService.DownloadBinder

    private val connection = object : ServiceConnection {

        // Activity与Service绑定成功调用
        override fun onServiceConnected(name: ComponentName,
                service: IBinder) {
             // 调用MyService.DownloadBinder中方法来指挥Service
            downloadBinder = service as MyService.DownloadBinder
            downloadBinder.startDownload()
            downloadBinder.getProgress()
        }

        // Service创建进程崩溃或被杀掉时调用,不常用
        override fun onServiceDisconnected(name: ComponentName) {

        }
    }

    override fun onCreate(savedInstanceState: Bundle?) {
        ...
        // 绑定Service
        bindServiceBtn.setOnClickListener {
            val intent = Intent(this, MyService::class.java)
            // BIND_AUTO_CREATE:绑定成功后自动创建Service
            // 绑定成功后Service中onCreate()会得到执行
            // onStartCommand()不会执行
            bindService(intent, connection, Context.BIND_AUTO_CREATE)
        }

        // 解绑Service
        unbindServiceBtn.setOnClickListener {
            unbindService(connection)
        }
    }
}
四、Service生命周期
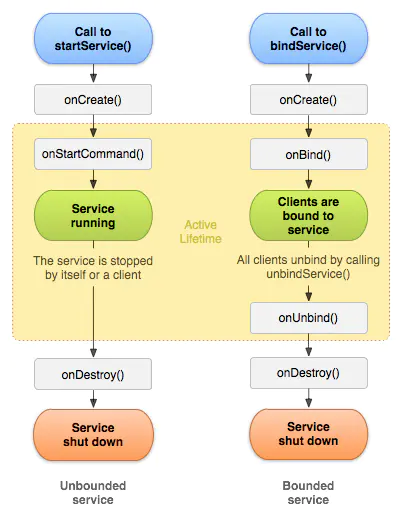
一旦在项目任何位置调用了Context的startService()方法,相应的Service就会启动并回调onStartCommand()方法。如果这个Service之前还没有创建过,onCreate()方法就会先于onStartCommand()方法执行。
Service启动之后会一直保持运行状态,直到stopService()或stopSelf()方法被调用或者被系统回收。
注意:虽然每调用一次startService()方法,onStartCommand()就会执行一次,但实际上每个Service只会存在一个实例,所以不管调用多少次startService()方法,只需要调用一次stopService()或stopSelf()方法,Service就会停止。
另外还可以调用Context的bindService()方法来获取一个Service的持久连接,这时就会回调Service中的onBind()方法。类似的,如果这个Service之前还没有创建过,onCreate()就会先于onBind()方法执行。只要调用方和Service之间的连接没有断开,Service就会一直保持运行状态,直到被系统回收。
调用startService()方法之后,再去调用stopService()方法,这时Service中的onDestroy()方法就会执行,表示Service已经销毁。类似的绑定和解绑Service也一样。
如果对一个Service既调用了startService()又调用了bindService(),必须同时调用stopService()和unbindService()方法,onDestroy()才会执行。
五、使用前台Service
前面已经说过,Android8.0之后,只有当应用或Service保持在前台可见的状态下,Service才能保证稳定运行。否则一旦应用进入后台之后,Service随时都有可能被系统回收。
前台Service和普通Service最大的区别就在于它一直会有一个正在运行的图标在系统的状态栏显示,下拉状态栏后可以看到更加详细的信息,非常类似于通知的效果。
由于状态栏中一直有一个正在运行的图标,相当于我们应用以另一种形式保持在前台可见,所以系统不会倾向于回收前台Service。
1.前台Service代码
下面演示创建前台Service,修改MyService中代码:
class MyService : Service() {
    ...
    override fun onCreate() {
        super.onCreate()
        Log.d("MyService", "onCreate executed")
        val manager =
            getSystemService(Context.NOTIFICATION_SERVICE)
            as NotificationManager
         if(Build.VERSION.SDK_INT >= Build.VERSION.O) {
             val channel = NotificationChannel("my_service",
                 "前台Service通知",
                 NotificationManager.IMPORTANCE_DEFAULT)
             manager.createNotificationChannel(channel)
         }
         val intent = Intent(this, MainActivity::class.java)
         val pi = PendingIntent.getActivity(this, 0, intent, 0)
         val notification = NotificationCompat.Builder(this,
             "my_service").run {
             setContentTitle("This is content title")
             setContentText("This is contente text")
             setSmallIcon(R.drawable.small_icon)
             setLargeIcon(BitmapFactory.decodeResource(resources,
                 R.drawable.large_icon))
             setContentIntent(pi)
             build()
         }
         // 让MyService变成前台Service
         // 第一个参数是通知id,第二个参数是Notification对象
         startForeground(1, notification)
    }
}
2.权限声明
Android9.0开始,使用前台Service必须在AndroidManifest.xml中进行权限声明,如下所示:
<manifest ...>
    <uses-permission android:name="android.permission.FOREGROUND_SERVICE" />
</manifest>
六、使用IntentService
由于Service是在主线程中运行,所以如果要在Service中执行耗时任务时必须要开启子线程,但总有一些程序员会忘记开启线程,或者忘记调用stopSelf()方法,从而导致程序未响应(ANR)或者一直处于运行状态,为此Android专门提供了一个IntentService类,这个类就很好的解决了前面所提到的两种尴尬。
新建一个MyIntentService类,继承自IntentService,代码如下:
// 传入随意字符串,仅在调试时有用
class MyIntentService : IntentService("MyIntentService") {

    // 此方法中代码在子线程中运行,不用担心出现ANR问题
    override fun onHandleIntent(intent: Intent?) {
        // 打印当前线程的id
        Log.d("MyIntentService",
            "Thread id is ${Thread.currentThread().name}")
         // 代码执行完成后此Service自动停止
    }

    override fun onDestroy() {
        super.onDestroy()
        Log.d("MyIntentService", "onDestroy executed")
    }
}