Android持久化技术
Android持久化技术包括文件存储、SharedPreferences、数据库三种。
一、文件存储
Context类中提供了openFileOutput()与openFileInput()方法用于将数据存储到文件夹中与读取数据,所有文件都默认存储在:/data/data/
/file/。
1.存储
openFileOutput方法有两个参数,第一个参数是文件名,第二个参数是操作模式,有 MODE_PRIVATE、MODE_APPEND两种,分别代表覆盖文件和追加内容,默认为第一个。
fun save(text: String) {
    try {
        val output = openFileOutput("data",Context.MODE_PRIVATE)
        val writer = BufferedWriter(OutputStreamWriter(output))
        writer.use {
            it.write(text)
        }
    } catch (e: IOException) {
        e.printStackTrace()
    }
}
2.读取
openFileInput接受一个文件名参数。
fun load() : String {
    val content = StringBuilder()
    try {
        val input = openFileInput("data")
        val reader = BufferedReader(InputStreamReader(input))
        reader.use {
            reader.forEachLine {
                content.append(it)
            }
        }
        return content.toString()
    } catch (e: IOException) {
        e.printStackTrace()
        return ""
    }
}
二、SharedPreferences存储
SharedPreferences属于键值对存储、类型存储,有两种方法可以获取SharedPreferences实例。SharedPreferences只有MODE_PRIVATE这一种操作模式。数据存储在:/data/data/
- Context
Context的getSharedPreferences()方法,接受两个参数,分别是文件名称与操作模式。 - Activity
Activity的getPreferences()方法,只接受一个操作模式参数,文件名默认为Activity类名。
1.存储
// 存储需要先获取SharedPreferences.Editor对象
val editor = getSharedPreferences("data",Context.MODE_PRIVATE).edit()
editor.putString("name","Tom")
// 提交数据
editor.apply()
2.读取
val sp = getSharedPreferences("data",Context.MODE_PRIVATE)
val name = sp.getString("name")
3.简化SharedPreferences用法
// 方法一:自建高阶函数
fun SharedPreferences.open(
        block: SharedPreferences.Editor.() -> Unit) {
    val editor = edit()
    editor.block()
    editor.apply()
}
// 使用自建高阶函数
fun main(){
    SharedPreferences.open {
        putString("name","Tom")
    }
}

// 方法二:使用Google KTX扩展库(原理与上方自建类似)
fun main(){
    SharedPreferences.edit {
        putString("name","Tom")
    }
}
三、SQLite数据库存储
Android为了让我们更方便管理数据库,提供了一个抽象类SQLiteOpenHelper,有两个抽象方法onCreate()和onUpgrade(),分别用来创建和升级数据库。
SQLiteOpenHelper中有两个重要的实例方法,getReadableDatabase()和getWritableDatabase(),这两个方法都可以创建或打开一个现有数据库,当数据库不可写入时,getReadableDatabase()方法将以只读方式打开,而getWritableDatabase()方法将出现异常。
// 首先实现我们自己的数据库类
// SQLiteOpenHelper第三个参数返回自定义Cursor,传null即可
// name和version分别代表数据库名和版本
class MyDatabaseHelper(val context: Context, name: String, version: Int) :
        SQLiteOpenHelper(context,name,null,version) {
    private val createBook = "create table Book (" +
            " id integer primary key autoincrement," +
            "author text," +
            "price real," +
           "pages integer," +
           "name text)"
    override fun onCreate(db: SQLiteDatabase) {
        //执行SQL代码创建Book表
        db.execSQL(createBook)
    }

    override fun onUpgrade(db: SQLiteDatabase, oldVersion: Int, newVersion: Int) {
        //更新数据库
    }
}
1.创建数据库和表
调用getWritableDatabase()方法后会先检测"BookStore.db"数据库是否存在,如果不存在就执行onCreate()方法并执行上面添加的创建"Book"表的SQL代码,
// 创建BookStore.db数据库,指定当前版本为1
val dbHelper = MyDatabaseHelper(this,"BookStore.db",1)
dbHelper.writableDatabase
2.升级数据库
假设几周后需要添加Category表,先在onCreate()方法中添加建表的SQL代码,但是如果老用户直接覆盖安装新版,在调用getWritableDatabase()方法时系统检测到已经存在"BookStore.db"表就不会去调用onCreate()方法了,这时就需要使用到升级数据库onUpgrade()方法了。
class MyDatabaseHelper(...) ... {
    ...
    private val createCategory = "..."
    override fun onCreate(...) {
        ...
        //创建Category表
        db.execSQL(createCategory)
    }

    override fun onUpgrade(db: SQLiteDatabase, oldVersion: Int, newVersion: Int) {
        // 如果用户设备上数据库版本小于等于1就执行
        if(oldVersion <= 1) {
            db.execSQL(createCategory)
        }
    }
}

//创建数据库,指示版本为2
val dbHelper = MyDatabaseHelper(this,"BookStore.db",2)
dbHelper.writableDatabase
这样的话,如果用户安装新版,就会执行onUpgrade()方法,并新建Category表。如果用户第一次就安装了2版,也会执行onCreate()方法中的新建Category表命令。这样不管是老用户覆盖安装,还是新用户直接安装最新版,都能始终保持与最新版数据库内容一致。
3.添加数据
insert()方法接收三个参数:表名、在未指定添加数据的情况下给某些可为空列自动赋值null、ContentValues对象。
// 用SQLiteDatabase方法添加数据
val dbHelper = MyDatabaseHelper(this, "BookStore.db", 2)
val db = dbHelper.writableDatabase
val values = ContentValues().apply{
    put("name", "The Da Vinci Code")
    put("author", "Dan Brown")
    put("pages", 454)
    put("price", 16.96)
}
db.insert("Book", null, values)

// 用SQL添加数据
db.execSQL("insert into Book(name,author,pages,price)" +
    " values(?,?,?,?)", arrayOf("The Da Vinci Code","Dan Brown",
    "454","16.96"))
4.更新数据
update()方法接收四个参数:表名、ContentValues对象、三四参数用于约束更新。
// 用SQLiteDatabase方法更新数据
val dbHelper = MyDatabaseHelper(this, "BookStore.db", 2)
val db = dbHelper.writableDatabase
val value = ContentValues().put("price", 10.99)
db.update("Book", value, "name=?", arrayOf("The Da"))

// 用SQL更新数据
db.execSQL("update Book set price = ? where name = ?",
    arrayOf("10.99", "The Da Vinci Code"))
5.删除数据
delete()方法接收三个参数:表名、二三参数用于约束删除对象。
// 用SQLiteDatabase方法删除数据
val dbHelper = MyDatabaseHelper(this, "BookStore.db", 2)
val db = dbHelper.writableDatabase
db.delete("Book", "pages > ?", arrayOf("500"))

// 用SQL删除数据
db.execSQL("delete from Book where pages > ?", arrayOf("500"))
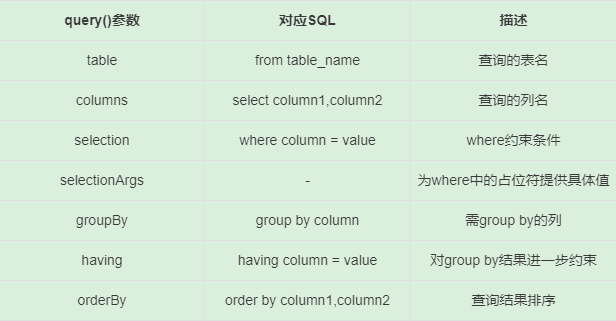
6.查询数据
query()方法参数最少的一个也要七个参数,返回Cursor对象,下面是参数详解:
// 用SQLiteDatabase方法查询数据
val dbHelper = MyDatabaseHelper(this, "BookStore.db", 2)
val db = dbHelper.writableDatabase
// 查询Book表所有数据
val cursor = db.query("Book",null,null,null,null,null,null)
if(cursor.moveToFirst()) {
    do{
        //遍历Cursor对象
        val name = cursor.getString(cursor.getColumnInedx("name"))
    } while(cursor.moveToNext())
    cursor.close()
}

// 用SQL查询数据
val cursor = db.rawQuery("select * from Book",null)
四、使用事务
比如银行程序用户1给另一个用户2汇钱,为了防止在用户1账户中的钱被扣除后出现异常导致这笔钱凭空消失,可以使用事务。
db.beginTransaction()    // 开启事务
try{
    db.delete("Book",null,null)    // 删除数据
    val values = ContentValues().apply{...}
    db.insert("Book",null,values)    // 添加数据
    db.setTransactionSuccessful()    //事务执行成功
} catch(e: Exception) {
    e.printStackTrace()
} finally {
    db.endTransaction()    //结束事务
}
//现在在调用setTransactionSuccessful()方法之前如果出现异常的话。
//所有已经更改的数据将会恢复
五、简化ContentValues使用
KTX提供的contentValuesOf()
val values = contentValuesOf("name" to "Game of Thrones",
    "author" to "George Martin", "pages" to 720,
    "price" to 20.85)
db.insert("Book",null,values)